Run a Background Check: It’s Most of Your Photo
Here’s an uncomfortable truth: your subject is not the whole photo. I know, betrayal. You spent all that money on a big lens, got up before sunrise, skipped the second cup of coffee like some sort of tragic hero, and finally found the animal. Surely that animal is the photo.
Not quite.
In most wildlife and nature images, the background takes up more of the frame than the subject. More pixels. More real estate. More opportunity for visual nonsense to sneak in and ruin everything like a raccoon at a campsite.
A great bear, bird, whale, waterfall, or wildflower can still make a mediocre image if the background looks like it was assembled during a yard sale. Bright sticks, awkward branches, other photographers, mystery blobs, road signs, hot white sky, your friend’s elbow. The camera records all of it with the cold honesty of a tax auditor.
So yes, your subject matters. But the background is the stage. And if the stage is a dumpster fire, no amount of adorable puffin energy is going to save you.
Have Feet, Will Travel: Change Your Angle
The easiest way to fix a bad background is also the one photographers forget because we’re all busy fiddling with settings like we’re trying to dive a submarine.
Move.
A few inches left or right can remove a branch from behind a bird’s head. Kneeling down can turn a muddy mess into distant trees. Standing higher can replace a cluttered horizon with clean snow, sand, grass, or water. Same subject. Same light. Same camera. Less visual garbage.
Imagine photographing a bison in Yellowstone. From standing height, the background might include a road, a sign, and six other photographers dressed like they’re invading a small country. Drop lower and suddenly the bison is backed by a snowy hillside or soft pines. Congratulations, you have upgraded from “wildlife near infrastructure” to “majestic beast of the American West.”
When you can move safely and respectfully, do it. Wildlife does not need you crawling into its personal space like a deranged paparazzo, but if shifting your position improves the image without disturbing the subject, that’s the move.
Ask yourself: what is directly behind my subject? If the answer is “a branch, a person, a bright blob, or something I’ll curse at later while editing,” change your angle.

Patience is a Virtue: Plan Your Background and Wait for the Subject
Most photographers see an animal and start chasing it with their camera like a golden retriever after a tennis ball. Understandable, but not always effective.
A better approach is to find a great background first, then wait for the subject to wander into it. This is photography with a little dignity. A little planning. A little less “spray and pray.”
Look for the stage before the actor arrives. A glowing patch of backlit grass. A clean strip of beach. A shaded opening in the forest. A lava rock shoreline with blue ocean behind it. A river bend where bears are likely to walk. A canyon wall catching warm reflected light.
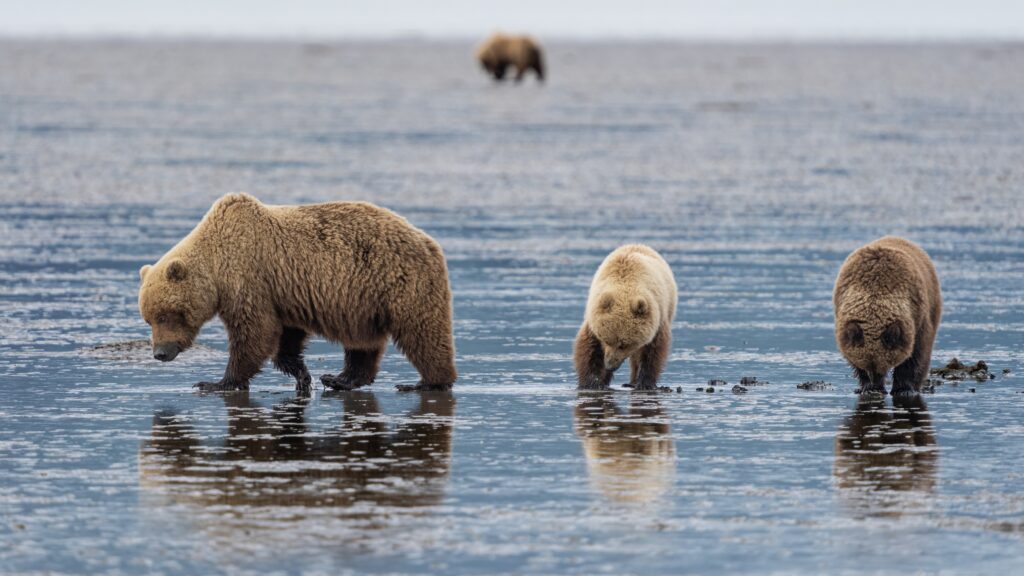
In the Galapagos, you might frame a stretch of black lava and wait for a marine iguana to lift its gloriously prehistoric head. In Alaska, you might compose a lakeshore scene and wait for a bear to step onto the photogenic beach. In the desert Southwest, you might set up on a red rock background and wait for a raven to drift through like it owns the place, which it probably does.
This approach takes patience, which is inconvenient because patience is the least glamorous photography accessory. But it works. Build the image in pieces: background, light, subject, moment. Then take the photo when all the ingredients finally stop fighting each other.
Bokeh Beauty: Use Depth of Field
Bokeh is the fancy word for the soft, out-of-focus background that makes photographers sound more sophisticated than they usually are. It’s also incredibly useful.
A shallow depth of field can turn a chaotic background into a creamy wash of color. Use a wider aperture like f/2.8, f/4, or f/5.6. Longer lenses help too, which is one reason wildlife photographers carry lenses roughly the size of a small child.
But here’s the catch: aperture alone is not magic. If your subject is pressed right against a bush, the bush is still going to look like a bush. Maybe a slightly drunk bush, but still recognizable. The farther your subject is from the background, the smoother that background becomes.
Distance is your friend. A bird 30 feet in front of the trees will separate beautifully. A bird shoved into the branches will look like it’s being consumed by salad.
Also, don’t get drunk on wide apertures. If you’re photographing a large animal at f/2.8, you may get one eyelash sharp and the rest of the animal dissolving into mush. Artistic? Maybe. Useful? Depends how much you like explaining your photo.
For small wildlife, f/5.6 or f/6.3 is often a good starting point. For larger animals, f/8 can give you more breathing room while still separating the subject if the background is far enough away.
Framing Isn’t Just for Physical Prints
Framing is when you use natural elements to surround or guide the viewer toward your subject. Branches, grasses, canyon walls, ice, rock arches, shadows, and reflections can all do the job.
When it works, framing adds depth and intention. When it doesn’t, it looks like you photographed an animal through a bush because you panicked. Which, to be fair, happens.
A gorilla photographed through soft leaves can feel intimate, like you’re peeking into its world. But if the leaves cover the eyes or become brighter than the gorilla, the image stops being intimate and starts being a botanical hostage situation.
Framing also works beautifully in landscapes. A waterfall framed by dark trees feels secluded. A mountain framed by wildflowers feels inviting. A canyon framed by an arch gives the scene structure and saves it from becoming yet another “look, rocks” photo.
The big thing to watch is brightness. The viewer’s eye goes to bright areas first because human brains are simple little moths. If your frame is brighter than your subject, you’ve created a distraction with extra steps. Darker framing elements usually work better because they push attention inward.
Do You See What I See? Hopefully Clean Edges Around My Subject
Clean edges are the difference between a subject that pops and a subject that gets visually swallowed by the swamp.
A clean edge means the outline of your subject is easy to read. The head, body, wings, antlers, beak, or tail should not merge with random junk behind it. This sounds obvious until you get home and realize your beautiful elk appears to have a dead tree growing directly out of its skull.
We’ve all done it. The “branch antler.” The “horizon through the neck.” The “second animal’s rear end attached to the main subject.” Nature is not always elegant. Sometimes nature is a composition goblin.
Before pressing the shutter, scan the edges of your subject, especially around the head and eyes. Is a branch cutting through the antlers? Is the horizon slicing the body in half? Is another animal lurking behind your subject like an unpaid extra?
Sometimes the fix is movement. Sometimes it’s waiting. A grazing animal may lift its head. A bird may turn. A bear may take two steps into a cleaner space. Fire a short burst when those clean moments happen because they may last about as long as your willpower near a plate of fries.
Watch for Distractions and Command Their Attention
Distractions are the little visual parasites of photography. Bright rocks. Random sticks. Clipped wings. Blown-out sky. Vehicles. People. Trash cans. The mysterious out-of-focus blob that will haunt you forever.
Your brain ignores them in the moment because it is drunk on the subject. “Look, a fox!” it says, while completely failing to notice the neon backpack in the corner of the frame.
Your camera, unfortunately, is sober. It records everything.
Before taking the photo, check the corners. Then the edges. Then the area around the subject’s head. This takes one second and can save you from hours of muttering at Lightroom like it personally betrayed you.
That said, not every background element is bad. Habitat matters. A bear in a meadow, penguins on a rocky slope, or a tortoise in misty highlands tells a richer story than a sterile animal portrait floating in creamy nothingness. The goal is not to remove the entire world. The goal is to remove the stuff that makes the viewer say, “Why is there a picnic table behind that wolf?”
I’ll Leave You With This
Mastering the background is not glamorous. Nobody buys a camera because they dream of managing negative space like a responsible adult. But this is where photos get better.
Change your angle. Choose the background before the subject arrives. Use depth of field to beat clutter into submission. Frame with intention. Keep the edges clean. Kill the distractions before they kill the image.
One of the best places to practice this is on Nat Hab’s Galapagos Wildlife Photo Expedition, where the wildlife is famously approachable and the backgrounds are a photographer’s buffet: black lava, blue ocean, sandy beaches, cactus forests, volcanic cliffs, and misty highlands. You can work a marine iguana against lava, a sea lion against surf, or a giant tortoise in lush greenery without needing to chase anything like a lunatic. It’s a dream location for learning how a clean background can turn a good wildlife encounter into a great photograph.
Happy Photographing,

Leave a reply