How to Set Up (and Maximize) your Point-and-Shoot Camera for Wildlife Photography
There is a saying in the photography world that ‘the best camera is the one you have with you.’ This is oh-so-true, and with the advent of advanced digital cameras, particularly in the point-and-shoot world, you can really have your cake and eat it, too. With point-and-shoots (essentially, cameras that do not have interchangeable lenses), you can take stunning photos all within a small, lightweight and compact camera that can be at your side at virtually all times.
However, it’s important to eek out every bit of photo capturing capabilities in order to ensure wall-worthy shots. Because of their simplicity, the settings and modes that are ‘automatic’ and come ready as soon as you take your camera out of the box, can vary significantly from make and model, and oftentimes doesn’t maximize your resolution and ability to make creative, aesthetic choices in your photography.
In this article, we’re going to dive into the simple but effective settings you may wish to change in order to set up and maximize your point-and-shoot camera for wildlife photography. Whether you’re headed on a quintessential African safari, like those to Botswana and Tanzania, or on safaris in less ‘traditional’ areas like Alaska or the Galapagos Islands.
Resolution and File Format
For some reason, many point-and-shoot cameras are initially set up by manufacturers without their highest photo resolution picked in the menu system. Because these sensors are smaller, and, frankly, not as defined and fancy as the bigger DSLRs and higher end mirrorless cameras (i.e., those with interchangeable lenses), ensuring top level resolution is really important. Not only does this give you a better image quality, but it allows for some cropping after the fact.
Every make and model of camera is different, but image resolution is usually in one of the first menu systems of any camera menu and it should be set at the highest level megapixel count. Sometimes the terminology is funny, like photo quality: medium, high, super high, and ultra fine. Rather than try and determine which word means best, look for numbers. Oftentimes they’ll have a pixel count or ratio next to each setting. For example, ‘high’ might be 1000 x 1500 pixels, whereas very high or the highest quality may be 3000 x 4500. To maximize resolution, you’ll want to choose the setting with the most pixels–simply put. Once you set it, it’s unlikely to revert back, but it’s worth checking this pre-trip or before any photo shoot to ensure it stayed that way–it’s that important.
For the most part, point-and-shoots rely on the JPEG file format. This is a great file format, and it’s what nearly all photographers use to share, upload, and print photos. However, some of the higher end point-and-shoots (e.g., ‘bridge’ cameras) will allow you to shoot in RAW format. RAW is indeed a higher quality format and allows for significantly more and better editing, if that’s your thing. However, it comes at a cost. The file sizes are 5 to 10 times larger than even the highest quality JPEG, and you must edit and export your photos. Raw files out-of-camera tend to have a very flat color profile and just don’t look as good. However, they retain much more data, allowing you to make the edits that you want on your computer, then exporting to an even higher quality JPEG.
Ultimately, you should at very least switch to the highest quality JPEG, but if you are the type to edit your photos and want to eek out maximum resolution and quality, considering switching to RAW, if it’s available.
Autofocus
Another setting that is oftentimes ‘pre-set’ out-of-the-box is a full zone autofocus. This means that when you use autofocus, your camera uses your entire screen to choose what it thinks should be the focal point. This is problematic, especially with wildlife, because we oftentimes have multiple subjects (e.g., multiple bears, lions, whatever), or wildlife in vegetation, and what the camera thinks should be in focus oftentimes is not what you want in focus. To abate this, go to your autofocus settings in your menu and select two different things.
First, you’ll want to select the smallest, single square in the middle of your frame as your autofocus point. This allows you to predictably know that only the dead middle of your frame will be the thing you focus on, vs. having the camera ‘search’ for what to focus on. You simply just need to aim at your wildlife subject, hold the shutter halfway down to ‘lock’ focus, and while holding it down halfway, recompose your shot for an interesting composition. Voila…subject in tack-sharp focus each and every time.
Second, which is equally critical, is to ensure that your focusing is set to single instead of continuous (or with Canon cameras, continuous is known as ‘servo’ focusing). Fortunately, cameras are usually set on single by default. But if it were on continuous, your camera would continuously re-focus to whatever is in that box. Thus, even if you hold your shutter halfway and try and lock focus (in order to recompose your shot, so that the animal is not in the dead middle of your frame) your camera will refocus to whatever is in that box just before you take the photo. You can imagine how this becomes problematic.
Adjusting Exposure via P-Mode
There are loads of creative controls even in the most introductory point-and-shoot cameras. But the most important is the ability to change exposure, which is camera-speak for how bright or dark your photo is–a core part of photography.
Exposure is a funny thing, in that you don’t always want your photos ‘perfectly exposed.’ And perfect is very prescribed in the digital camera as having an average of 18% gray across your scene–it’s very specific. This, the camera thinks, is the right balance for every scene. However, we know that a photo in a dimly lit rainforest should probably look a little darker. A photo in the bright sun of the African savanna should probably look a tad brighter.
Having creative control over how much light or dark is in the scene is very important to a solid photo, and even more important for your creative vision in the shot.
The problem is that if you shoot on full automatic mode (not autofocus, but auto settings) you cannot change this. Your camera won’t allow you. Thus, I highly advocate for shooting on P-mode (P stands for ‘Program’) which still has full autofocus, and fully automatic settings, but it allows you to adjust your exposure. Your camera then does the calculation and settings to compensate…easy peasy.
Once you are on P-mode, simply find the exposure icon, usually a + and – button, and dial one of your wheels until you notice a little bar pop up and allow you to go brighter–to the + end, or darker, to the – end.
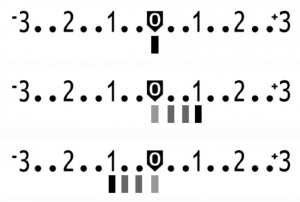
Cameras do this in small increments, so you only need to dial a notch or two to see a difference. And then when shooting, how much you choose to dial is up to you! Just remember that for many shots, an even exposure (zero) is the right pick, so I wouldn’t recommend shooting an entire trip on an over or under-exposed setting. You will likely have to manually change it back.
Your Drive Motor
Another valuable thing P-mode allows you to do is to change your drive motor, which is essentially how many photos your camera will take per second of holding the shutter down. For wildlife specifically, you want a high drive motor so that you can capture behavior. Oftentimes in a single yawn of a lion there is one moment that is best, so having 5 or even 10 photos of that behavior can pay massive dividends.

If you are more conservative, and don’t want to take that many photos, you can set your drive motor on something more moderate, like 3 to 5 photos a second. Even this will still be a big level up vs. the out-of-the-box single photo every time you press the shutter.
Want the best of both worlds? In other words, want to be able to take fast photos of action, but revert back to single photos for landscapes? Become accustomed to where in your menu this is found and change it throughout the day, from scene to scene. Yes, it’s more work, but to squeeze out ever bit of photo power and get more and better shots, this is what the pros do.
Removing Digital Zoom
This is a biggie for point-and-shoots. So many today boast these wild zoom abilities, like 50x or 100x zoom. To put it into context, a ultra-premium $10,000 lens for a fancy DSLR or mirrorless camera might only give you the equivalent of 8 or 10x zoom (although in these cameras this is measured in focal length, like a 400, 500, or 600mm). So, the point is that A) you shouldn’t expect a point and shoot to be able to give you 30, 40, or 100x zoom without sacrificing quality, significantly. And B) point-and-shoot cameras often use something called digital zoom to get you to these extreme limits.
Digital zoom is nothing more than the camera physically cropping the photo as you zoom past its ‘optical’ zoom point. Optical zoom is different. This is ‘real’ zoom and is actually using lenses and physics to give you the shot–retaining the original size of the image. But digital zoom is just ‘cropping in’ so that it looks like you are getting in closer, but you are sacrificing the overall resolution and number of pixels because you are, well, cropping the photo–just as you would experience on the computer.
Some photos do need some cropping, but I highly advocate that you turn digital zoom off and leave the cropping to the computer. Oftentimes, when you are not judging a photo’s efficacy based on the tiny LCD screen, you’ll notice you didn’t need to crop that much, if at all. And there is no difference in using digital zoom in-camera vs. cropping on the computer, execept for the fact that in-camera you cannot undo this. What you have is what you get. Whereas on the computer, if you start to crop and find that the image deteriorates, you can simply go back to the original. It’s a massive safety next.
In Summary
As digital cameras improve, what was only possible on the highest-end pro level photos, is now possible on even base models of point-and-shoot cameras. In the end, getting great wildlife photos with a point-and-shoot isn’t about buying new gear—it’s about unlocking the potential of the camera already in your hand.
By dialing in a few key settings—maximizing resolution, choosing the right file format, taking control of autofocus, using P-mode for exposure tweaks, setting an appropriate drive mode, and ditching digital zoom—you dramatically increase your odds of coming home with sharp, compelling, wall-worthy images you can look back on with the fondest of memories!
Go forward and give is a shot,
Court
Leave a reply