Rotate the Camera Already: A Case for Verticals
Horizontal photos have such a chokehold on landscape photography that the words “landscape orientation” have literally become the default term for it. The assumption baked into photography since the film era is that the world and everything in it is meant to be viewed in a wide rectangle. So we most often point our camera this same way. But the world is not always a panorama. Some landscapes rise up. Some wildlife stands tall.
This guide breaks down when and why to use the vertical format, because someone needed to say it plainly: stop worshiping the horizontal frame like it paid your mortgage.
Why Verticals Deserve More Love
Let’s start with the obvious. Horizontal framing feels instinctive when looking at a landscape. One theory behind this habit is that humans naturally perceive scenes on a horizontal axis since our eyes sit side by side. We scan from left to right. We absorb mountains, lakes, and forests on a lateral axis. It’s comfortable. It’s habitual. Heck, modern cameras are built to be held horizontally. And because of that, a lot of photographers never think to rotate their camera unless something tall forces them to.
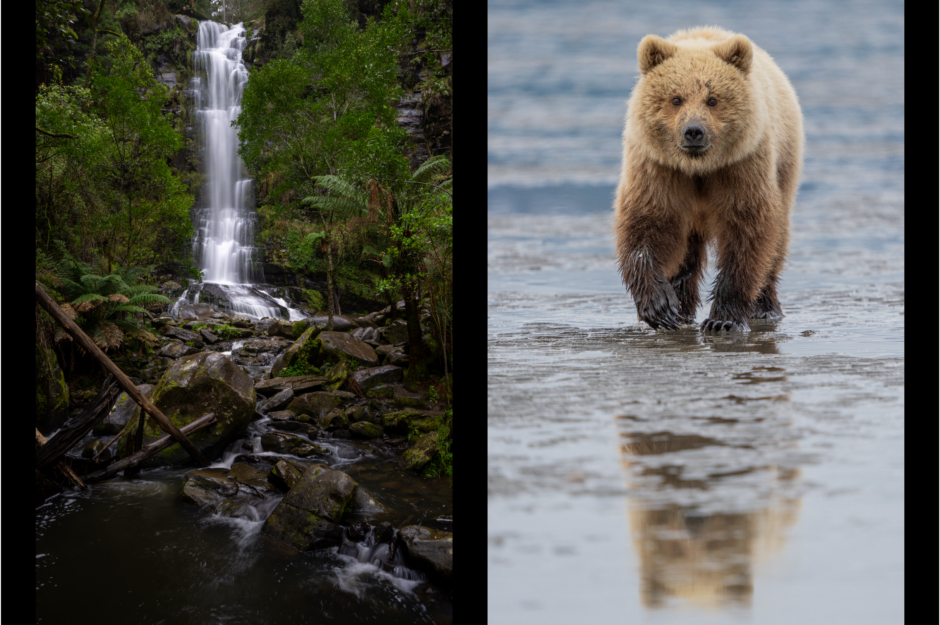
But here is the reality. Many landscapes look better when you shoot them vertically. The world contains waterfalls, canyons, cliff faces, trees, glacier walls, and towering rock formations. These subjects stretch upward. They are built for a vertical frame.
Vertical framing is not only for landscapes. Wildlife photography is packed with subjects and behaviors that look dramatically better when shot vertically. Animals stand, stretch, climb, jump, perch, and posture. Horizontal orientation often leaves too much dead space or cuts off the energy of the moment.
Shooting in vertical orientation gives you a fresh perspective, sharpens your compositional instincts, and forces you to decide what matters rather than letting the frame sprawl “just because”. Turning your camera sideways is like discovering a new pocket in your old jacket. More space. More possibilities.
Below are the clearest situations where a vertical frame will make your photography sing.
When to Shoot Vertically
It’s Taller Than It’s Wide
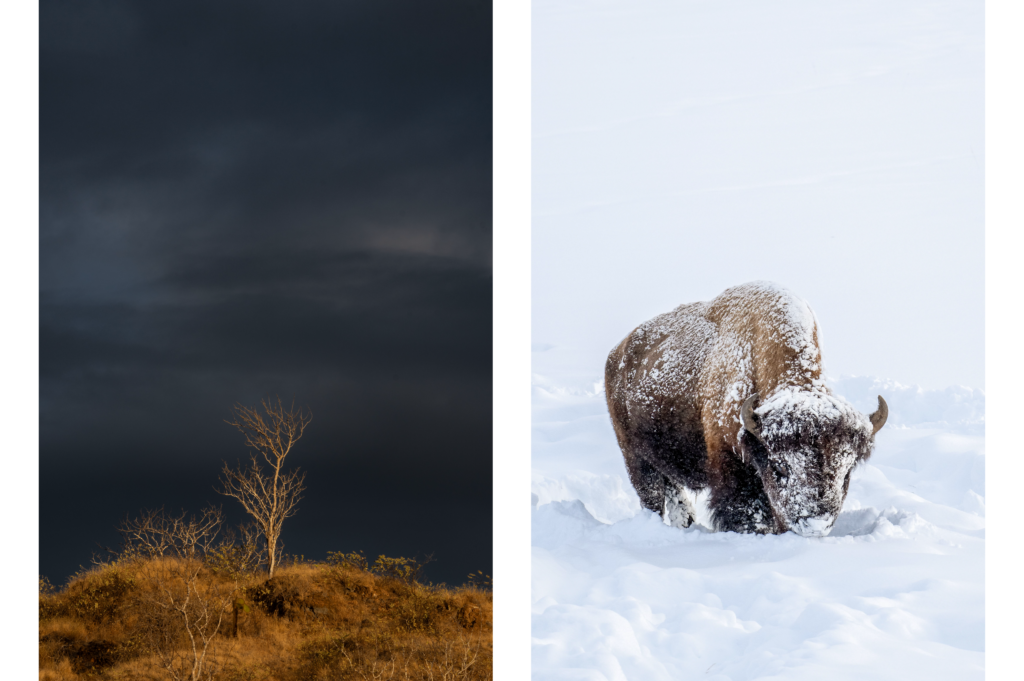
A vertical photo works best when your main subject itself is vertical. A Greenland iceberg rising like a monolith. A sandstone fin in Utah. Standing brown bears in Alaska. Upright kangaroos in the Australian outback. These are vertical elements in vertical moments. These subjects deserve height. A horizontal frame can clip their height, add unnecessary side space, and weaken the moment.
This sounds obvious, but a lot of photographers fight it. If your main feature looks like a tower, shoot it like one.

Looking Up or Down
Elevation creates natural vertical compositions. When your subject is above or below your eye line, the scene takes on height even if the creature itself is not tall. Vertical orientation highlights the rise, the perch, and the relationship to the space below. Mind you, landscapes have direction too. A mountain slope draws the eye upward. A canyon pulls your gaze into the earth. A waterfall channels motion straight down the frame.
If you find yourself tilting your camera quite a bit, consider a vertical to really sell your angle.

Accentuating Negative Space
Adding negative space to your image can simplify your composition, making it is easy for the viewer to understand the subject and the message you are getting across. Of course, negative space can be captured in any orientation, but the quickest way to find negative space is to look up. The sky is always there, so you can tilt your camera, put your subject at the bottom of your frame and give it tons of head room.
If you’ve got some space to work with and a subject you want to highlight, try the vertical. You’ll thank me later.
Leading Lines & Layers
A winding river, a meandering trail. A series of hillsides or rocky layers. There are some scenes that beckon the viewer’s eye to move through them. In some cases these leading elements move right to left. In other cases, they move from near to far. For those instances, using a vertical frame can keep your viewer focused and following the path you’ve captured. Think lane bumpers at your local bowling alley.
If you find your eye moving through a landscape from close to distant, give it the ol’ vertical treatment and bowl a strike.

Emphasizing Foreground Elements
You can think of this rule as a combo of the previous two. Start by finding a strong foreground anchor close to your lens, because foreground elements come alive in vertical composition and immediately pull the viewer into the frame. Move low, use a wide angle lens, and exaggerate the depth so the scene stacks naturally into layers. Think in terms of foreground, midground, and background, each contributing something meaningful to the story. When those zones line up and lead the eye upward through the frame, the image gains structure, balance, and a sense of scale that a horizontal shot often can’t match.
Now step back and enjoy your new vertical masterpiece.
Tight Wildlife Portraits
Why the long face? Most critters, certainly mammals and birds, have faces that are orientated vertically. Sometimes, you get lucky enough to be quite close and can zoom all the way in on your subject. Forget the feet, the tail, the whole body really and tilt your camera to match your subjects eyes and nose/snout/beak/pincers.
Verticals feel intimate because they match how we visually focus on faces in real life.

For Your End Use
Unless you intend to let your newly captured photos rot forever on a hard drive, never to be seen again, chances are you have plans for them. It might be as simple as a social media post or something more involved like a wall print or even a magazine publication. As our phones are portrait orientation, most social media is built best for tall photos. Magazines and other print publications are often in a vertical aspect ratio too.
If your gallery wall needs a little more variety, then shoot vertical.

Things to Consider Before Pressing the Shutter
- Does vertical framing reveal something horizontal framing hides?
- Does the composition feel stronger or just narrower?
- Does the scene benefit from stacked depth rather than lateral spread?
- Is the foreground adding value or just filling space?
- Are there leading lines that run up or down rather than side to side?
- Does the vertical format actually enhance the drama or am I forcing it?
If you are on the fence, shoot both. No one is grading your ratio choices. No one hands out vertical awards. But you will learn very quickly which one tells the stronger story.
Why Not Just Crop Your Shots Later?
Cropping a horizontal into a vertical can work, but it is never the strongest option. Cropping costs resolution and often ruins the composition because you framed the moment for a horizontal shape. When you shoot vertical from the start, you build the composition around the subject’s posture, behavior, and flow.
Final Thoughts
Vertical photography is not a gimmick. It is a mindset. A fresh perspective. And one of the best ways to add variety and strength to your wildlife and landscape portfolios. Landscapes gain depth. Wildlife gains presence. Behaviors and postures feel more dramatic. Foregrounds become richer. Lines become clearer.
Add vertical opportunities to your shot list before your next trip instead of waiting to stumble into them. The more you practice seeing vertically, the more natural it becomes.
And if you want a destination full of vertical subjects, the Southern Australia & Tasmania Photo Expedition is hard to beat. Eucalyptus forests stretching skyward, cliffs that drop into turquoise water, roos standing tall in golden light, koalas tucked upright into tree forks. It is a trip built for photographers who want to push beyond the usual wide shots and bring home images with real variety.
Happy photographing,

Leave a reply