Photographing my Galapagos Big 5
Galapagos photography has a reputation for being easy. Wildlife everywhere. No fleeing. Short lenses. No stress… All of that is true. And all of that is also why a lot of people come home with photographs that feel flat. So here, I’d like to focus on tips and tricks for capturing my Galapagos Big 5. Five iconic animals of the Enchanted Isles that should be bolded & underlined on every wildlife photographer’s shot list.
First a bit of housekeeping: the term “Big 5” comes from the “Africa Big 5”; lion, leopard, rhinoceros, elephant, and Cape buffalo. Iconic African large mammals originally chosen by 19th-century hunters as the most dangerous and difficult to hunt on foot. Here we’ll also be hunting on foot and taking shots, but the only trophies we’ll walk away with are pictures.
I call this MY Galapagos Big Five, as once you leave Africa, this designation is entirely arbitrary and open to personal opinion. Besides, for most places, its unlikely their most iconic species fit into a neat box of 5. Galapagos is a prime example. Some of my snubbed include the Galapagos Frigatebird, Flightless Cormorant, Sally Lightfoot Crab, Waved Albatross and of course Darwin’s Finches (mind you Darwin spent more time studying the local mockingbird species, but alas the finches got the name & the fame). I’ve also left out any of the purely marine species like hammerheads, orcas, whale sharks and sea turtles. Not out of any ill will (I’ll be the first in and last out on any snorkeling trip), but I must draw the line somewhere and the shoreline seems a good as spot as any for most wildlife photographers.
So enough with the pageantry, what are my Galapagos Big 5? In no particular order:
- Iguana
- Giant Tortoise
- Booby
- Seal/Sea Lion
- Penguin
They are approachable, predictable, and incredibly photogenic and apart from the Boobies, found nowhere else but here (in 2013 a rather lost Blue-footed Booby ended up in Vancouver). These species’ approachability can make photographers lazy. When the animals do not flee, the temptation is to get as close as your zoom will allow and fire away.
This guide is about slowing that process down. Paying attention to behavior, light, and positioning. Making deliberate choices even when the subject is ten feet away. These are the decisions that separate a souvenir photo from something you actually want to put up on the wall.
Iguanas (Reptiles by Land and Sea)
There are four species of iguanas in the Archipelago: the Marine Iguana, Yellow Land Iguana, the Pale Land Iguana and the Pink Iguana. The first two are the most common and are readily photographed on numerous islands. The other two have very restricted ranges; the Pale Land Iguana is found just on Santa Fe Island and the Pink Iguana requires a hefty hike up a single volcano on Isabela Island.
Marine iguanas are where most first timers start strong and finish poorly. They are everywhere. They pile up on lava rocks like cars in an interstate ice storm. People photograph them while standing up, looking down, and end up with a lot of spiky backs and cluttered backgrounds.
The first rule with marine iguanas is simple. Get low. Lower than you think. Eye level matters here more than with almost any other Galapagos animal. From above, they look like reptiles sunning themselves. From eye level, they look like ancient Godzillas. Watch behavior before lifting the camera. When they are cold, they stack tightly and barely move. When they warm up, heads lift, bodies separate, and interactions happen. This is when the photographs improve.
Light matters more than people expect. Black lava and dark skin can swallow detail fast. Early and late light gives you texture along the scales and faces. Overcast days are your friend if you want detail without harsh contrast. Lens choice depends on intent. A short telephoto lets you isolate heads and expressions. A wider lens works when you commit to getting close and include lava patterns or ocean spray. The mistake is standing back and splitting the difference.
My approach: Start with a mid range zoom. Drop to a knee or the ground. Watch for head lifts and profile turns. Shoot deliberately and then move on. There are always more iguanas.
Giant Tortoises (They’re Bigger Than You Think)
Giant tortoises are slow, patient, and unforgiving to rushed photographers. The most common mistake I see is people photographing them standing up, too close, with a wide lens, and cutting off shells or limbs. The result looks accidental. Remember, the headline here is that they’re GIANT. Find context in your compositions to get that message across.
Tortoises reward patience and distance. They are large animals with subtle expressions. You need to wait for those moments to present themselves. Position yourself so the tortoise is either fully isolated or fully contextualized. Half measures do not work here. If the background is messy, move. If the environment tells part of the story, step back and include it intentionally.
Watch for head movement. A tortoise lifting its head out of the shell changes the entire image. Eye contact matters. Without it, the photograph feels static. Light is often soft in the highlands where tortoises live. Use that. Side light reveals texture in shells that flat light hides. Avoid shooting straight into shadows under the shell unless you want mystery and are prepared to expose carefully. Lens choice should skew longer than people expect. A short telephoto compresses the shell and keeps proportions honest. Wide lenses only work if you are disciplined with framing.
My approach: Find a clean angle. Wait for the head to lift. Be selective in the frames you take. The tortoise isn’t going anywhere.
Boobies (One Foot, Two Foot, Red Foot, Blue Foot)
Boobies are crowd favorites (get your head out of the gutter). There are 3 species to find; Nazca, Red-footed, and the most famous: Blue-footed. These birds are the reason many people bring too much lens. They are expressive, animated, and often close. What trips people up is speed. Boobies move fast when they decide to move, and the moment is gone quickly.
The key here is anticipation. Watch the birds before raising the camera. Courtship displays follow patterns. Preening leads to head shakes. Nest exchanges happen the same way over and over. Positioning matters more than reach. Choose a background first. Clean sky, water, or dark lava all work if you commit. Once the background is set, wait for behavior to happen in that space.
Light angle is critical for white birds. Front light preserves detail. Side light adds drama but risks blown highlights. Pay attention to the chest and face, not just the eye. Lens choice depends on behavior. Portraits work well with mid range zooms. Action and flight benefit from longer focal lengths but only if you are ready for it with shutter speeds 1/2000 or higher.
My approach: Pick one bird or nest. Set exposure for white feathers. Wait for behavior. When it happens, shoot decisively.
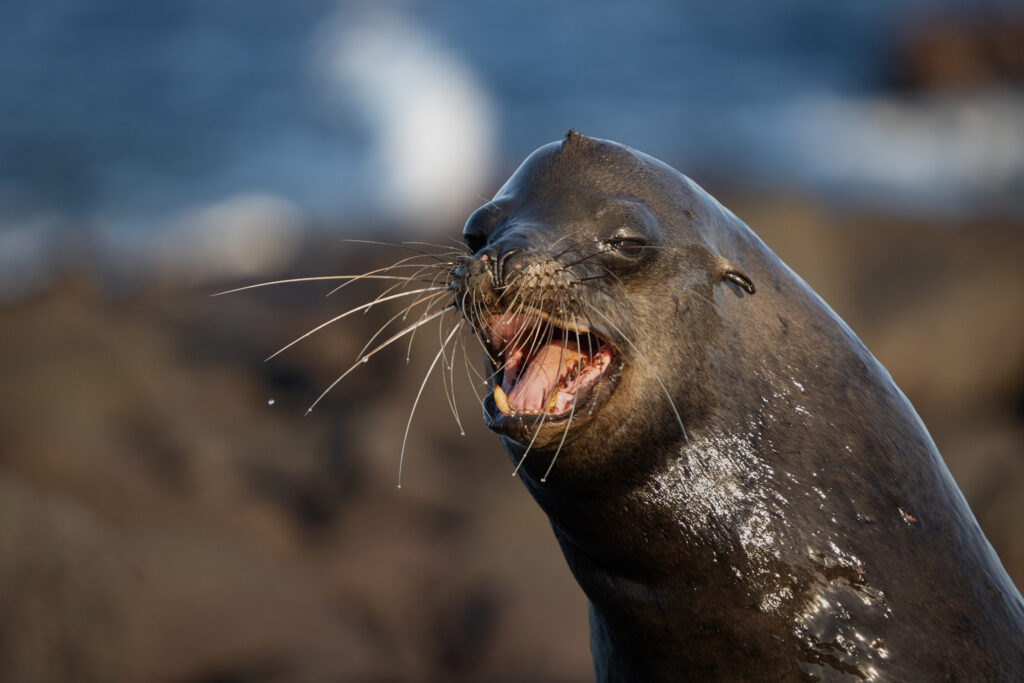
Pinnipeds (You Know, Seals and Sea Lions)
Galapagos Sea lions and Galapagos Fur Seals are chaotic in the best way. They move constantly, interact aggressively, and change expressions in seconds. The biggest mistake here is standing too high and too far back. From that angle, they become brown shapes on sand. Get low and close. Eye level turns chaos into connection. You see teeth, whiskers, and attitude.
Watch interactions. Sea lions are rarely alone. Dominance displays, yawns, and mock charges happen constantly. The mistake is trying to photograph everything at once instead of isolating one interaction. Light is often harsh on beaches. Look for angles where sand reflects light back into faces. Backlighting can work if you are intentional and expose carefully. Lens choice should stay flexible. A mid range zoom lets you respond quickly as animals move toward and away from you. Long lenses are useful but can limit reaction time.
My approach: Sit down. Let the animals move through the frame. React to behavior, not proximity.
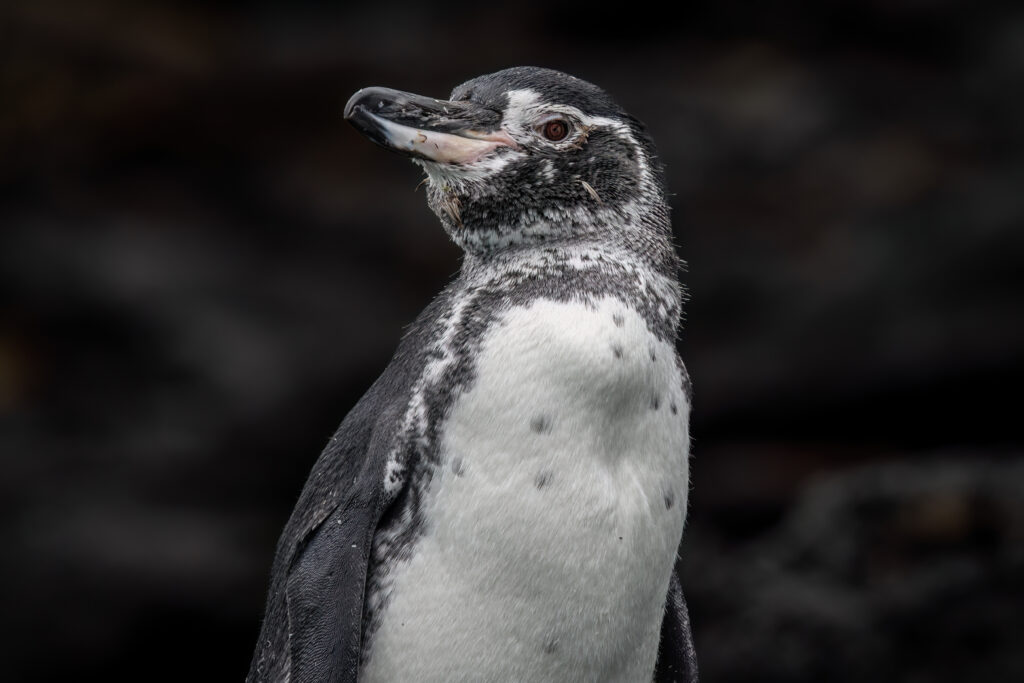
Galapagos Penguins (Did You Know This Was a Penguin Trip?)
Penguins are the smallest, fastest, and most frustrating of the Big Five. Their black feathers blend into dark lava. Their wet, white feathers catch the sunlight too well. A nightmare for nailing exposure. If you let your camera decide your settings, it will almost always underexpose the bird, robbing the black feathers of texture.
The key here is being ready to adjust quickly. For penguins, I prefer to work in Manual with Auto ISO and use exposure compensation to fine tune brightness. I keep highlight warnings turned on so I know exactly when I start clipping. Push the exposure as bright as you can without losing detail in the whites.
Pay attention to how light falls across the body. Angled light or thin cloud cover helps smooth the transition between black and white. Lens choice should give you enough reach without boxing you in. A telephoto lens helps isolate the penguin and creates enough background blur to separate it even from dark lava rock.
My approach: Meter for black detail first. Let the whites ride as high as you can. Focus, shoot, and triple check your exposure.
In Conclusion
The Galapagos rewards photographers who slow down. The animals do not run, but the moments still pass quickly. The difference is awareness.
This is where the Photo Expedition format makes a real difference. Smaller groups mean time. Time to wait for behavior. Time to reposition. Time to let a moment develop instead of grabbing the first version of it. That patience turns easy wildlife into meaningful photographs.
The Galapagos Big Five are approachable. That does not mean they are simple. Treat them with intention and they will give you far more than a checklist ever could.
Happy Photographing,

Leave a reply