
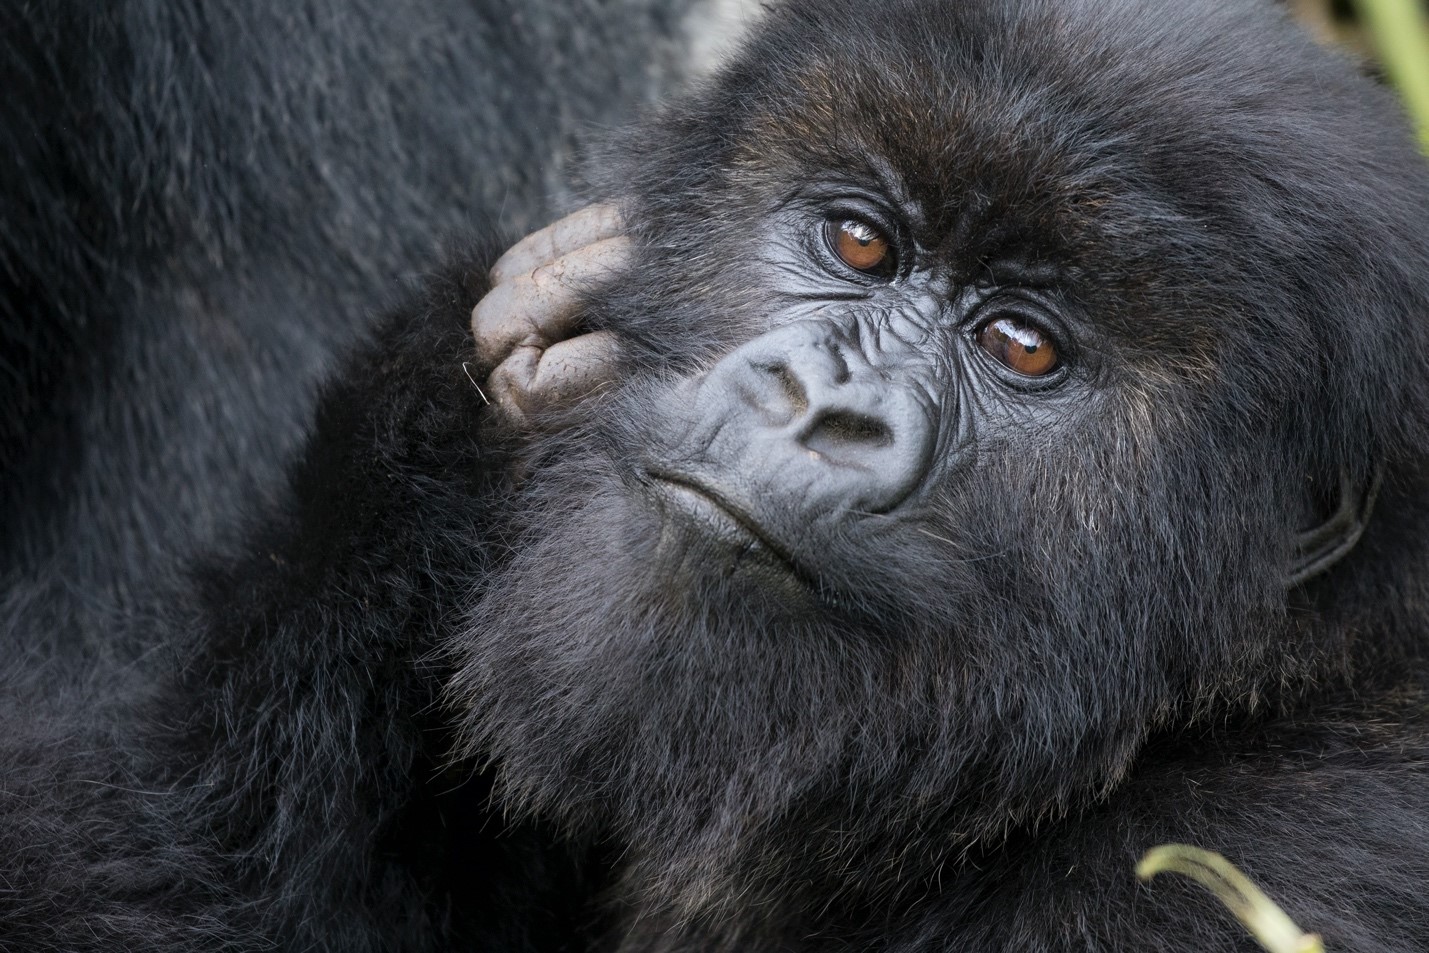
How to Get This Shot – A Gorilla’s Gaze
Photographing gorillas puts you in front of perhaps the single most impressive photographic subject on earth. Within the time you have with these primates, you’ll have ample photo opportunities, but the classic ‘filling-the-frame’ shot is no doubt one that we all wish to capture.
Read on for a deep dive into how to get this shot on a gorilla photo expedition!
Getting in Front of a Gorilla
The first step is of course getting in front of an animal like this. There are several ways to do this, whether you go to Uganda or Rwanda, and whether you join a proper photo expedition or on your own. To me, whether you choose Uganda or Rwanda doesn’t make a huge difference, but Rwanda is generally easier if you wish to add a gorilla safari onto the end of your traditional African safari. The proximity and logistics of travel make adding 4 or 5 days after, say, a Kenya Migration Safari or Tanzania Safari extremely doable.
If you are planning on a gorilla-focused safari, Uganda tends to give you a more well rounded experience by spending time with chimps as well as other highlights of this part of the East African jungle. If you are a passionate photographer, you will want to do both–this is an excellent way to really experience the region and its gorillas with oftentimes twice the viewing opportunities–a key thing for extraordinary photography!
Lens and Settings Choice
Once you are physically in front of a gorilla, the work begins! What lens and what settings are ideal?
To me, I find a medium or traditional telephoto lens, like a 70-200mm or 100-400mm is best. We always want more telephoto, so the 100-400 seems like the logical choice, but the fast aperture and shallow depth of field of most 70-200mm lenses make them a top choice. You may need to crop in a bit, but they tend to be extraordinarily sharp, and they allow for excellent low light capabilities. Nevertheless, the ideal situation is to have both at-the-ready.
Your primary concern with camera settings is what aperture. Shutter speed and ISO are really just a means to an end. But these will be very much dictated by the aperture you choose and the lighting conditions of the day, as well as the location of the gorillas. They can be out in the open with ample light, or in tree cover which can be dim light. But these tree-covered situations are phenomenal, as it provides for nice, even lighting. So, any conditions are great conditions!
If I am able to zoom all the way in to fill-the-frame in camera, such that I need minimal cropping if any at all, my goal is to shoot on a relatively deep depth of field. This corresponds to a bigger f/number, like f/8. This might sound contrary to most wildlife portraiture, but when filling the frame and wanting all parts of the face in good focus, it’s akin to taking a proper landscape shot…you want it all in focus.
However, don’t stop there, as a shallow depth of field for these types of shots can sometimes a) be necessary, in order to let in maximum light or b) quite creative, allowing intentional blur to create mystique and aesthetics in the photo. I highly recommend taking a range of photos from f/2.8 (if you have those capabilities) to f/4, f/5.6 all the way perhaps to f/11 if light allows. This gives you maximum possibilities when reviewing and selecting your final, favorite photos from the time with the gorillas.
If you are unable to fill the frame in camera, you may shoot at a lower f/number, like f/4 or f/2.8 and do just fine. Because depth of field depends on the proportion of your subject (which you want sharp) to the entire frame, using a 70-200mm and depending on cropping later can be an excellent strategy to have your cake and eat it, too. This allows you to use a fast aperture if light is limited, but also not sacrifice depth of field as much as if you were filling the frame in camera. Oftentimes I’ve found that intentionally planning to crop and shooting with my 70-200mm and at f/2.8 can yield extraordinary results.
A Note on Shutter Speed and ISO
Remember, these aren’t your primary concerns, but you must monitor them. If the gorillas are sedentary, you may be able to get away with 1/100 or 1/160 of a shutter. However, if there is any movement with the gorillas at all, be prepared to bump that up significantly. The amount you do so depends entirely on how much movement, but plan to double that if they are slightly moving (e.g., turning their heads, sitting down getting situated) and perhaps all the way up to 1/500 or faster. The faster you go the higher the ISO needed, but it’s more important to freeze the motion with a higher ISO vs. risking a slightly blurred gorilla in order to maintain a low ISO. Expect to use ISOs up to 1600 or 3200 routinely, which means that shooting on a full frame camera is preferred (although I realize this is more of a professional setup, so using de-noise software in lightroom or Topaz can be your best friend).
Composition and Focus
I typically start with the rule of thirds in order to focus here, which essentially has be placing the key focal point–the gorilla’s eyes–off center and at one of the four intersecting points. However, if you wish to have more creative control when editing, you may wish to shoot the photo zoomed out and plan to crop, which allows you to adjust composition for perfection on the computer later.

There are of course many ways to compose photos like this, but since we’re talking specifically about a filling-the-frame shot, I personally don’t stray far from traditional ‘portraiture’ style composition, which is indeed using the rule of thirds. In other cases I might deliberately exaggerate composition by putting the focal point way in the corner or the like, but in this case, I stick with the tried and true method.
This all being said, another virtue of using the 70-200mm and/or shooting to crop by deliberately not filling the frame in-camera but relying on editing to achieve your desired composition, is that you can put the animal in the middle of your frame, allowing ample space for cropping should you wish to experiment. This way you can actually have several final photos, each with different, creative composition, in the end.
I find that single point autofocus on single subject focusing does the trick here. There are of course more advanced methods like subject tracking or eye tracking, but I find that with a) the dark gorillas and b) the relatively calm nature of these animals it’s not necessary and leads to potentially more errors in focus vs. doing it the traditional autofocus method of having center point autofocus, locking focus on the eye by holding the shutter button halfway (or back button focus if you prefer that) and then recomposing.
A key message here is that you should always focus on the eye for these styles of shots.
In Summary
There is a very good chance you’ll have photo opportunities just like this one if you’re headed to photograph gorillas in Africa. The odds increase by joining professional photography guides, but the settings will be the same. Its key to be deliberate about aperture, focus, and composition, knowing that there is room for flexibility. Also, zooming out and planning to crop after the fact can do wonders for alleviating the in-the-moment frenzy of excitement and giving yourself maximum flexibility to compose your image later.
Wishing you the very best in photographing gorillas!
Court
Leave a reply